
AZZA Genesis 9000 Case Review: Building It Every Way
- Posted in
- Cases/Cooling/PSUs
- ATX
- AZZA
Assembling the AZZA Genesis 9000
Actually building a system in the AZZA Genesis 9000 is actually a bit daunting, due both to the weight of the enclosure and to the staggering amount of customization that can be done with it. Realistically if you just leave the motherboard tray in and build your system without actually playing with the Genesis 9000, it's not any more difficult than any other enclosure. It's going to be pretty hard to resist doing that, though.
Taking the motherboard tray out doesn't just involve removing the six thumbscrews in the rear; you also have to unwrap the cable ties behind the tray. The tray is on a pair of rails, and those rails are mirrored on the other side of the enclosure. Take it out, and you'll have to screw in some of the motherboard standoffs yourself; the Genesis 9000 only comes with the Mini-ITX ones installed by default. The back of the tray also flexes some, but that's to be expected and is actually more useful than a mark of poor build quality. Getting our testbed motherboard in was easy enough, and AZZA included the necessary mounting holes for a high end Micro-ATX board, holes which have actually been lacking in some of the other cases we've reviewed recently.
Installing our video card was also made much easier by the flex of the back of the tray. Aligning the I/O brackets with the screwholes in the back of a case can actually be difficult, but this is ameliorated by the give in the Genesis 9000's tray and lining up our GeForce GTX 560 Ti proved to be much simpler as a result.
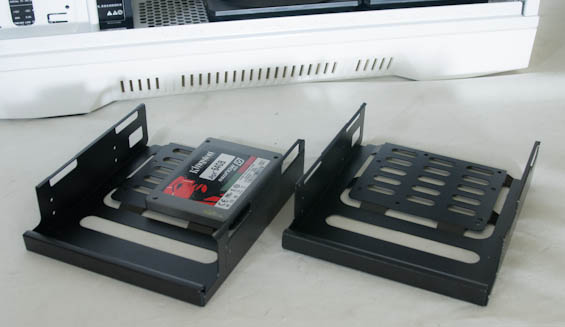
Installing drives in the Genesis 9000 is for the most part just as easy, but it bears mentioning that the Corsair Link kit we ordinarily use for testing couldn't be installed; the steel drive trays used for mounting 2.5" and 3.5" drives bottom-mount them, and the Corsair Link box has no bottom-mount holes. These trays are sturdy as all getout, though, and they line 2.5" and 3.5" drives alike with the two hot-swap backplanes that come preinstalled. Those backplanes are also removable and can be placed behind any of the 5.25" drive bays, and you can buy more from AZZA. The trays themselves have rounded bumps in the front to make them easier to grip, too, and the 5.25" drive bay shields pop out just by pinching the sides. While mounting drives to the trays isn't toolless, virtually everything else is, and the toolless clasps are in place on both sides of the drive cage as opposed to just one (as is typical of most modern cases). The result is a very secure, very flexible mounting system.


Getting the power supply in is only slightly more difficult. You need to snap the fan duct off of the centermost bottom intake fan to slide it into the front bay, but the real trouble lies in the front cover. There are two thumbscrews which hold it in place, but the plastic snaps are too thick and snug, and as a result I actually damaged one trying to remove the front cover. That's not a huge deal since the thumbscrews do most of the work, but it's worth mentioning.
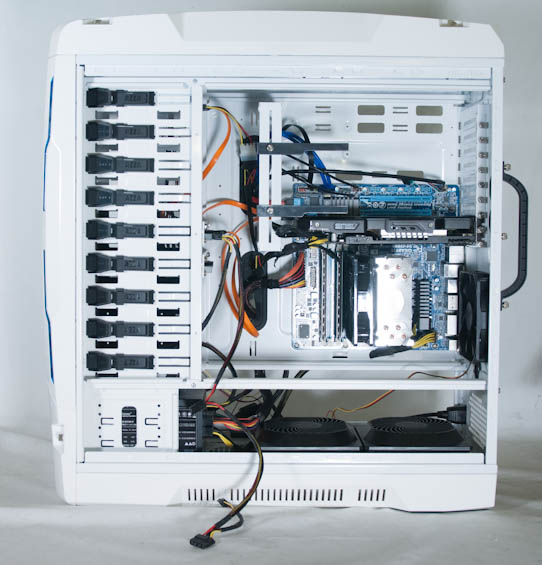
Maybe the biggest problem the Genesis 9000 has is cabling, and that's due to the front-to-back instead of lateral orientation of the drive bays. AZZA has done their best to simplify this, but routing data and power cables for drives behind the motherboard tray is a little less sensible in this case. Everything else routes fine for the most part, although it seems AZZA intended the motherboard tray to be used in the "inverted" default orientation instead of the standard ATX orientation due to where the top I/O cables are routed internally and the placement of the connectors on the hot-swap backplanes. Getting the rest of the cables in is basically child's play, though, if a bit messy due to the sheer number of cables coming off of the I/O cluster in the top of the case. Note that their fan controller has six 3-pin connectors in it, all occupied and all powered by a single 4-pin molex connector.
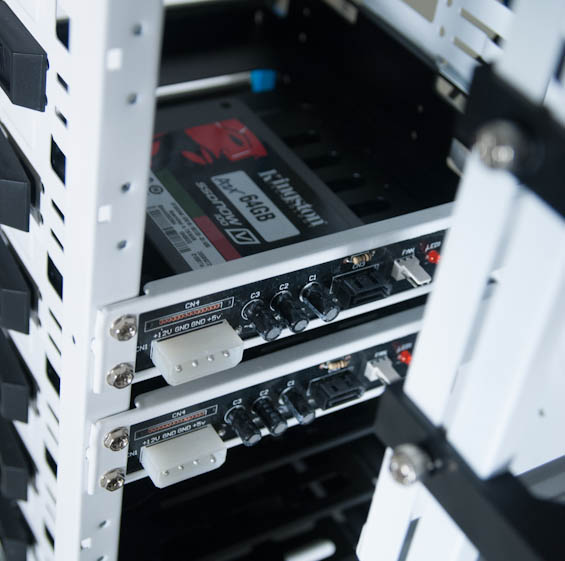
I appreciate that for the most part AZZA went whole hog with 4-pin molex instead of just using it a little bit here and there. If you're doing a minimal drive installation, you can actually get away with just not using SATA power leads from the power supply; it's a little more archaic, sure, but I prefer to use as few cables from the modular power supply as possible.
Honestly the AZZA Genesis 9000 is an intimidating piece of work due almost entirely to just how much you can do with it, the scope of which unfortunately can't be explored in this review. Build quality is pretty stellar, although I feel like the finish needs just a little more attention; the white plastic and white painted steel don't quite match up in tone, although going with black would probably fix that. The drive trays are incredibly sturdy, though, and the case seems to have been designed to take a bit of a beating. I can get behind that. If you're prone to tinkering endlessly your interest has probably already been piqued, but we still have test results to get to.
Originally published at https://www.anandtech.com/show/6088/azza-genesis-9000-case-review-building-it-every-way (Wayback Machine).