
Corsair Obsidian 650D: Transmuting Graphite to Obsidian
- Posted in
- Cases/Cooling/PSUs
- Corsair
- mid-tower
Assembling the Corsair Obsidian 650D
Amusingly, installing the testbed into the Corsair Obsidian 650D gave me a serious case of Groudhog Day (the movie). I'm so used to working inside the 600T, and the 650D's internal layout is nigh identical.
First, installing the motherboard was a breeze. I've been championing pre-installed motherboard standoffs for a while and Corsair delivers, with standoffs in place for a standard ATX board. Not just that, but the centermost standoff isn't a standoff at all, but a nub that will actually help hold the board in place and makes lining the rest of the mounting holes up a breeze. It's a simple addition that goes a long way towards easing the process.


Once again, with installing drives, ease of use is the name of the game. There's a tool-less mechanism that snaps into place when you install a 5.25" drive in one of the four external bays; to remove the drive, just push the lever down and the drive pops out. It's nice and secure, but just in case, there are also easily accessible mounting holes on the opposite side of the bay. The drive trays for 2.5"/3.5" drives are just as easy to use: they're plastic with four metal nubs surrounded by rubber, and the trays flex open to accept 3.5" drives and lock them into place. They also snap in and out of the drive cage with just the right amount of resistance. For mounting a 2.5" drive you'll need to use screws, but there are holes in the bottom of each tray explicitly for this purpose. It's not as easy as mounting a 3.5" drive, but I have yet to see a better 2.5" drive mount in an enclosure.
The vented expansion slot covers are held in place by thumbscrews, and are simple enough to remove. Installing our Zotac GeForce GTX 580 was a breeze, and the extra expansion slot at the bottom below the motherboard is such a welcome feature that I wish it was included in more enclosures: even the 650D's big brothers (the 700D and 800D) don't have it. I actually use the one in my 600T, having placed my secondary card (a GeForce GT 430) in the bottom-most slot. The card's cooler is a half a slot too wide, but fits in just fine in the 600T and would be perfectly fine here as well.
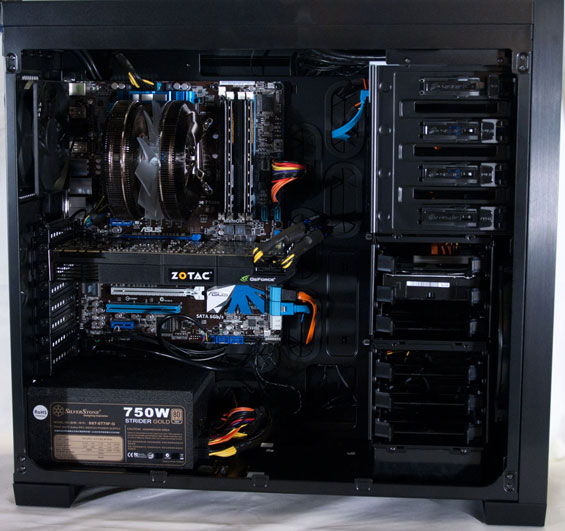
Getting the power supply in place required a bit of finagling as it almost always does, but in the end it wasn't too difficult. In fact the worst part of the entire installation is the same thing it's always been: routing cabling, specifically power cables. I feel like the opening in the motherboard tray next to the power supply for routing cables is actually a bit too small and this is one place where a revision would be appreciated. Still, getting all of the power cables routed was a bit more painless than it usually is, and with the ports of the 2.5" and 3.5" drives facing behind the motherboard tray, all of the data and power cables are lined up neatly and kept behind the tray.
Installing the testbed in the 650D reminded me of just how clean Corsair's internal design for it and the 600T really is, and you can really see it in our photos. Space behind the motherboard could be a hair more generous but is still ample, and the interior of the 650D remains remarkably clean. In fact my 600T with two occupied optical drive bays and all six drive trays occupied is still an extremely tidy build. Corsair's engineers made things as easy to keep neat as they conceivably could, and it shows.
Originally published at https://www.anandtech.com/show/4529/corsair-obsidian-650d-transmuting-graphite-to-obsidian (Wayback Machine).