
ASUS Maximus Formula SE: X38 and DDR2 Unite!
- Posted in
- Motherboards
Important BIOS Functions
We have picked out a few of the more important BIOS functions for a breakdown of their use and application. The "Advanced Tweaker" BIOS screen has quite a few secondary memory timing options; for the most part these can be left to board/SPD default values. We are providing the best "bang for the buck" manual settings below.
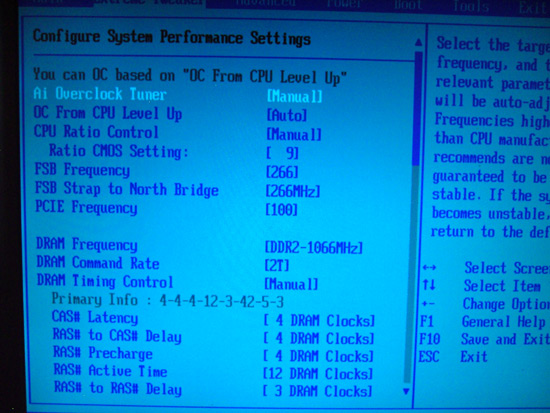
AI Overclock Tuner:
Set this function to manual for overclocking; the Auto function enables preset overclocks automatically when the system is under load.
OC from CPU Level Up:
ASUS enabled overclock profiles based upon the processor type in use; for manual overclocking this function may be left at Auto. If low level automatic preset overclocking is preferred, select either the CPU type or "Crazy" mode. Setting either of the latter two options adjusts all board voltages to preset values. The preset values themselves can be higher than is absolutely necessary for the applied overclock. The Auto overclock functions can be useful for beginners who are getting to grips with overclocking, with the option to move to manual overclocking later. We suppose this guarantees stability via a somewhat brute force approach. For long-term use we recommend using a manually set overclock.
FSB Strap to Northbridge:
The two straps of use for overclocking past 400FSB are 333 and 400. All other straps have lower FSB limits.
PCI-E Frequency:
If the ICH9R SATA ports are used then a setting around 115mhz is safe, though scores do not seem affected by the minimum 15mhz overclock. We noticed anything over 118MHz would cause problems with the drives or even the POST routines. Benchmarkers as usual are best advised to use an IDE drive, turn off all the peripherals, and then try to maximize the bus speed.
DRAM Frequency:
Available dividers are dependent on the FSB strap to Northbridge setting. For 333 we have 1:1, 5:6 and 5:8, while for 400 we have 1:1 and 3:4 memory divider ratios. Best overclocking results and performance are available from the 400 NB setting using the 3:4 divider. Access latency and overall bandwidth seem to reach their peak using the 400 NB strap around 450FSB and upwards with DDR2-1200 memory speed.
DRAM Command Rate:
Sets either 1N or 2N memory timing. 1N has a low memory MHz range (900MHz and under), useful only for the 1:1 divider. 2N is the preferred choice for outright performance when using good DDR2 at speeds greater than 900MHz.
DRAM Timing Control:
Set this to Manual to obtain control of all primary and secondary memory timing ranges. The BIOS shows primary and secondary timings above both respective sections. Users may wish to enter the shown timings manually for each setting and then experiment with tighter timings where possible. The board defaults are generally tight enough for 24/7 use. For benchmarking Memset allows access to setting ranges not accessible in BIOS.
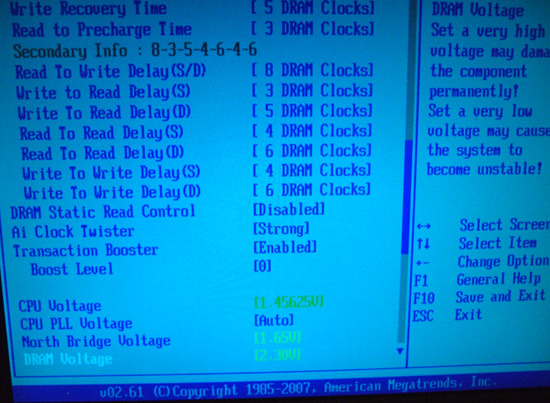
The following three settings are all amalgamated from tRD, tRD Phase adjust, and chipset performance registers areas that are fully unlocked on DFI boards. Rather than direct fine control, ASUS prefers an auto manipulation of preset combinations, with a limited user set range. Results are fairly average using relaxed combinations. The X38 chipset itself seems to favor 333 and 400NB straps, which in turn limits the range of use of ASUS' spin on these settings. We look at possible setting ranges below.
DRAM Static Read Control:
This function is best set to "Disabled" for high FSB levels (450 FSB upwards). "Enabled" gives a small gain in memory access latency at the expense of overall stability. We believe this setting alters a single TRD phase to low; performance advantages either way are not stellar.
AI Clock Twister:
We recommend use of the "Strong" setting wherever possible. Setting "Weak" reduces overall bandwidth and access latency. "Strong" brings the x38 chipset performance almost in line with the P35 using DDR2 memory. Please note, we did not find setting "Weak" worked well with the 400 NB strap at 465FSB.
Transaction Booster:
Ranges here are from 0-7 (0-3 are stated as usable in BIOS), with either the "Enabled" or "Disabled" setting. The 0 setting with either "Enabled" or "Disabled" selects the default tRD level for the NB strap and memory divider combination. The Enabled function lowers tRD (tRD -1) and/or tRD phases with each additional digit over 0, meaning an upward scale increase or boost is more aggressive with Transaction Booster set to Enabled. If using the 333 NB strap, set Transaction Booster to Disabled and use either 0 or 1 as the "Relax level" setting. When using the Relax setting range (Disabled Transaction Booster), using higher numbers will increase tRD (tRD +1) and tRD Phase adjust for lower overall performance, allowing access to higher FSB speeds. For quad-core overclocking the 400 NB strap performs best with Transaction Booster set to Enabled and 0 as the Boost Level setting - unless you're chasing higher FSB speeds at the expense of overall performance. Dual-core CPUs capable of high FSB speeds may use the "Relaxed" setting of 3 if outright FSB speed is the goal.
CPU PLL Voltage:
Scale range is 1.5-3V in 0.02V increments. Stock is 1.5V, although overvolting can bring small increases to FSB limits. We do not recommend using past 1.75V for long-term use.
North Bridge Voltage:
Scale range is 1.25V-1.85v. Stability is greatly affected by NB temperatures, and temps over 47C are prone to failures during longer Prime torture test runs. Active cooling of the NB is recommended for overclocking. A combination of air and water-cooling generates the best results when using the stock ASUS water block and heatsink combo. Voltages around 1.61V-1.65V are required for overclocking past 440FSB.
DRAM Voltage:
ASUS provides us with a searing 1.8V-3.4V scale. The board does overvolt the BIOS setting by around 0.04V, and users are advised to subtract this value from the BIOS setting to stay within warranty voltages for memory ( yes, we said that with a straight face).
Loadline Calibration:
Available options are Auto, Disabled, and Enabled. Use "Enabled" for overclocking. This function reduces Vcore voltage sag. We found a measured droop of around 0.021V under full CPU load and an undervolt of around 0.0125V at CPU idle with the Enabled setting. These are excellent results and ASUS should be commended for addressing previous Vdroop problems on their boards.
We have picked out a few of the more important BIOS functions for a breakdown of their use and application. The "Advanced Tweaker" BIOS screen has quite a few secondary memory timing options; for the most part these can be left to board/SPD default values. We are providing the best "bang for the buck" manual settings below.
AI Overclock Tuner:
Set this function to manual for overclocking; the Auto function enables preset overclocks automatically when the system is under load.
OC from CPU Level Up:
ASUS enabled overclock profiles based upon the processor type in use; for manual overclocking this function may be left at Auto. If low level automatic preset overclocking is preferred, select either the CPU type or "Crazy" mode. Setting either of the latter two options adjusts all board voltages to preset values. The preset values themselves can be higher than is absolutely necessary for the applied overclock. The Auto overclock functions can be useful for beginners who are getting to grips with overclocking, with the option to move to manual overclocking later. We suppose this guarantees stability via a somewhat brute force approach. For long-term use we recommend using a manually set overclock.
FSB Strap to Northbridge:
The two straps of use for overclocking past 400FSB are 333 and 400. All other straps have lower FSB limits.
PCI-E Frequency:
If the ICH9R SATA ports are used then a setting around 115mhz is safe, though scores do not seem affected by the minimum 15mhz overclock. We noticed anything over 118MHz would cause problems with the drives or even the POST routines. Benchmarkers as usual are best advised to use an IDE drive, turn off all the peripherals, and then try to maximize the bus speed.
DRAM Frequency:
Available dividers are dependent on the FSB strap to Northbridge setting. For 333 we have 1:1, 5:6 and 5:8, while for 400 we have 1:1 and 3:4 memory divider ratios. Best overclocking results and performance are available from the 400 NB setting using the 3:4 divider. Access latency and overall bandwidth seem to reach their peak using the 400 NB strap around 450FSB and upwards with DDR2-1200 memory speed.
DRAM Command Rate:
Sets either 1N or 2N memory timing. 1N has a low memory MHz range (900MHz and under), useful only for the 1:1 divider. 2N is the preferred choice for outright performance when using good DDR2 at speeds greater than 900MHz.
DRAM Timing Control:
Set this to Manual to obtain control of all primary and secondary memory timing ranges. The BIOS shows primary and secondary timings above both respective sections. Users may wish to enter the shown timings manually for each setting and then experiment with tighter timings where possible. The board defaults are generally tight enough for 24/7 use. For benchmarking Memset allows access to setting ranges not accessible in BIOS.
The following three settings are all amalgamated from tRD, tRD Phase adjust, and chipset performance registers areas that are fully unlocked on DFI boards. Rather than direct fine control, ASUS prefers an auto manipulation of preset combinations, with a limited user set range. Results are fairly average using relaxed combinations. The X38 chipset itself seems to favor 333 and 400NB straps, which in turn limits the range of use of ASUS' spin on these settings. We look at possible setting ranges below.
DRAM Static Read Control:
This function is best set to "Disabled" for high FSB levels (450 FSB upwards). "Enabled" gives a small gain in memory access latency at the expense of overall stability. We believe this setting alters a single TRD phase to low; performance advantages either way are not stellar.
AI Clock Twister:
We recommend use of the "Strong" setting wherever possible. Setting "Weak" reduces overall bandwidth and access latency. "Strong" brings the x38 chipset performance almost in line with the P35 using DDR2 memory. Please note, we did not find setting "Weak" worked well with the 400 NB strap at 465FSB.
Transaction Booster:
Ranges here are from 0-7 (0-3 are stated as usable in BIOS), with either the "Enabled" or "Disabled" setting. The 0 setting with either "Enabled" or "Disabled" selects the default tRD level for the NB strap and memory divider combination. The Enabled function lowers tRD (tRD -1) and/or tRD phases with each additional digit over 0, meaning an upward scale increase or boost is more aggressive with Transaction Booster set to Enabled. If using the 333 NB strap, set Transaction Booster to Disabled and use either 0 or 1 as the "Relax level" setting. When using the Relax setting range (Disabled Transaction Booster), using higher numbers will increase tRD (tRD +1) and tRD Phase adjust for lower overall performance, allowing access to higher FSB speeds. For quad-core overclocking the 400 NB strap performs best with Transaction Booster set to Enabled and 0 as the Boost Level setting - unless you're chasing higher FSB speeds at the expense of overall performance. Dual-core CPUs capable of high FSB speeds may use the "Relaxed" setting of 3 if outright FSB speed is the goal.
CPU PLL Voltage:
Scale range is 1.5-3V in 0.02V increments. Stock is 1.5V, although overvolting can bring small increases to FSB limits. We do not recommend using past 1.75V for long-term use.
North Bridge Voltage:
Scale range is 1.25V-1.85v. Stability is greatly affected by NB temperatures, and temps over 47C are prone to failures during longer Prime torture test runs. Active cooling of the NB is recommended for overclocking. A combination of air and water-cooling generates the best results when using the stock ASUS water block and heatsink combo. Voltages around 1.61V-1.65V are required for overclocking past 440FSB.
DRAM Voltage:
ASUS provides us with a searing 1.8V-3.4V scale. The board does overvolt the BIOS setting by around 0.04V, and users are advised to subtract this value from the BIOS setting to stay within warranty voltages for memory ( yes, we said that with a straight face).
Loadline Calibration:
Available options are Auto, Disabled, and Enabled. Use "Enabled" for overclocking. This function reduces Vcore voltage sag. We found a measured droop of around 0.021V under full CPU load and an undervolt of around 0.0125V at CPU idle with the Enabled setting. These are excellent results and ASUS should be commended for addressing previous Vdroop problems on their boards.
Originally published at https://www.anandtech.com/show/2374 (Wayback Machine).