
Gateway FX530: Mad Cows and Quad Core Overclocking
- Posted in
- Systems
Internals and Design
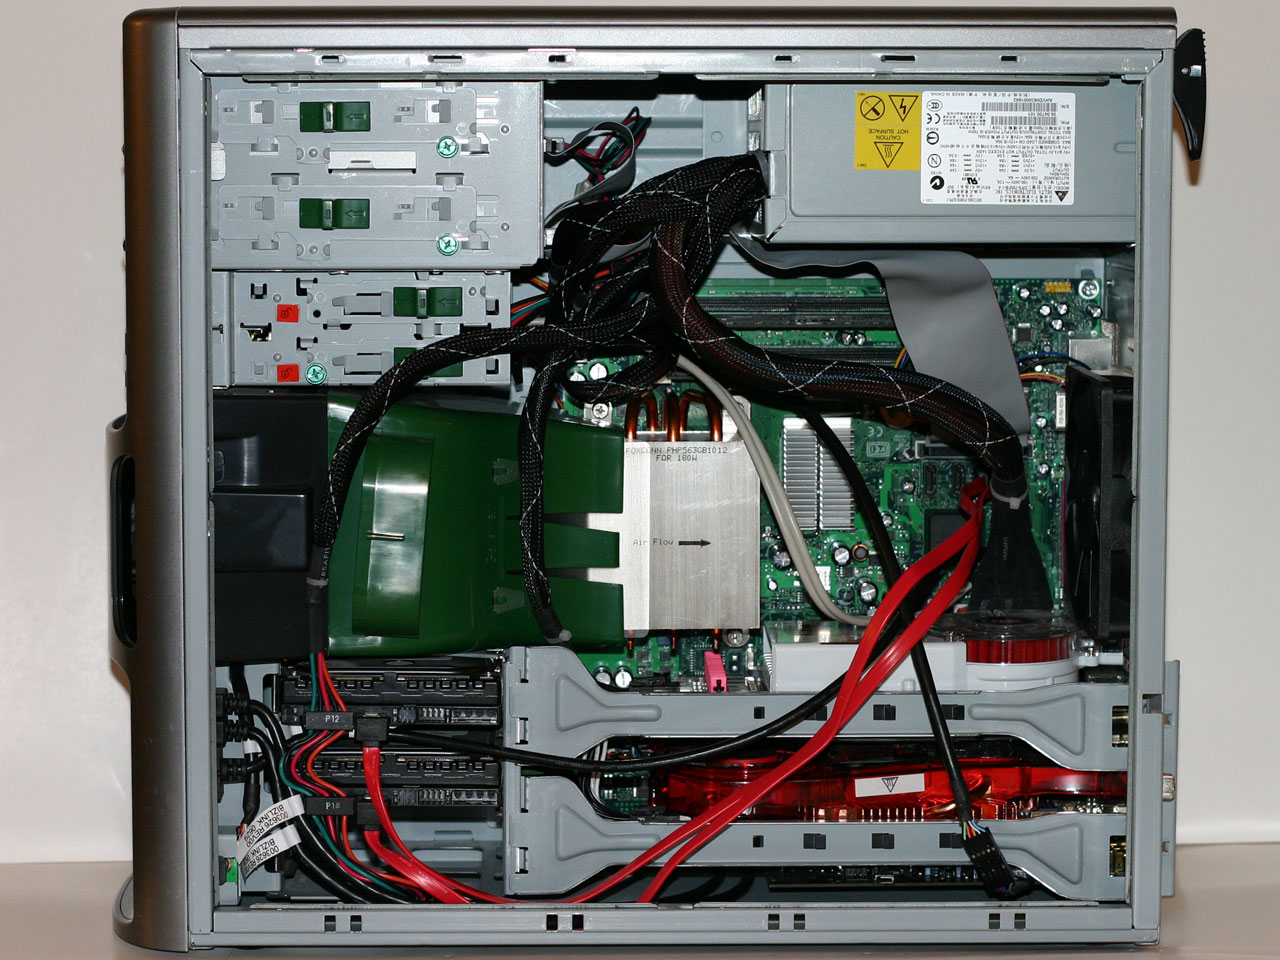
Removing the side panel to get at the interior is quite simple and takes only seconds. With the side out of the way we get our first look at the interior. Everything is relatively tidy, but the wiring standards certainly aren't up to the quality of the elite system builders. Most of the cables are left hanging, but they do not directly block any of the fans so airflow isn't impeded. That's the most important thing when looking at the internals of a case, especially when it comes to a case that holds an overclocked quad core processor.
Some of the cables could be talked out of the way better, but having clean cables is something of a Catch-22. Having all of the cables tucked out of the way makes things look clean, but the flip side is that if you ever have to do any work on the interior of the PC, all of the tucked away cables are much more likely to cause problems than help out. If you ever have to change out components, nice wiring jobs where everything is zip-tied out of the way can be a real pain to deal with. Given that the Gateway FX530 doesn't have any windows on the side panels, having an exquisite wiring job really isn't necessary.
Gateway could have done a better job, but given the choice between better wiring and a lower price tag, we would typically opt for the cost savings and clean up the cabling ourselves if it ever presents a problem. In a sense the wiring job is a good representation of the system as a whole. It's functional and will get the job done, but it's not going to win any style awards. Some people are interested in getting an exotic PC that will stand out from the crowd, and they are interested in outward appearances rather than the bottom-line performance. The Gateway FX530 eschews form and style and focuses predominantly on functionality.
We mentioned the weight of the system earlier, and after looking at the interior you can start to get an idea of where some of the weight comes from. The two graphics cards along with the CPU heatsink are all pretty large, and additional weight is added in the form of two support bars that help to hold the graphics cards in place. The support bars do make removing your graphics cards - or any other expansion card for that matter - a bit more difficult, but they also contribute to the overall sturdiness of the case.
At the bottom-front of the case are the three internal hard drive bays. The hard drives slide into place and are then secured by the sliding green latch on the side. This makes installing or removing hard drives simple, although the GPU support bars do make reaching the green lever a bit less convenient. Also, the hard drives tend to fit extremely snugly, so removing them does require more effort than we at first expected. Similarly, the optical drives have a latching mechanism that makes it easier to add or remove drives. Besides the latching mechanism, however, a single thumbscrew is also used to help secure each optical drive. Below the optical drives, it is possible to install a fourth hard drive above the flash memory reader, although there is less ventilation to this area and more cable clutter so it's more difficult to gain access. We would also be hesitant to install some of the warmer HDDs like the Raptors or the 750GB Seagate in such a tight space, as long-term reliability might be compromised.
You can also see in the above picture that the plastic shroud that helps direct ventilation over the CPU heatsink can be removed. Behind the shroud is a large 120mm variable speed fan. When the system is idle, it's pretty quiet all things considered. Once you start to run a few CPU intensive applications, however, the temperature controlled fans rapidly begin to speed up and make more noise.
Helping out the front fan is a second 120mm fan at the rear of the system. Again, this reminds us of the Dell XPS 410 design, only with more processing power available. The two fans help to create a nice wind tunnel effect over the CPU and chipset area, keeping the system relatively cool without generating a whole lot of noise.
With all of the powerful components present in the system, it's not too surprising to find a large 700W power supply feeding the beast. The power supply is manufactured by Delta Electronics, a brand that is present in many OEM desktop and laptop systems. The quality may or may not be up to the level of some of the enthusiast power supplies, but in testing we did not encounter any difficulties. The PSU has four separate 12V lines, with a combined output not to exceed 50A. Likewise, the total output on the 3.3V and 5V lines is not to exceed 140W. The power supply is rated to handle a continuous load of 700W, however, which is far more than the tested configuration is able to use.
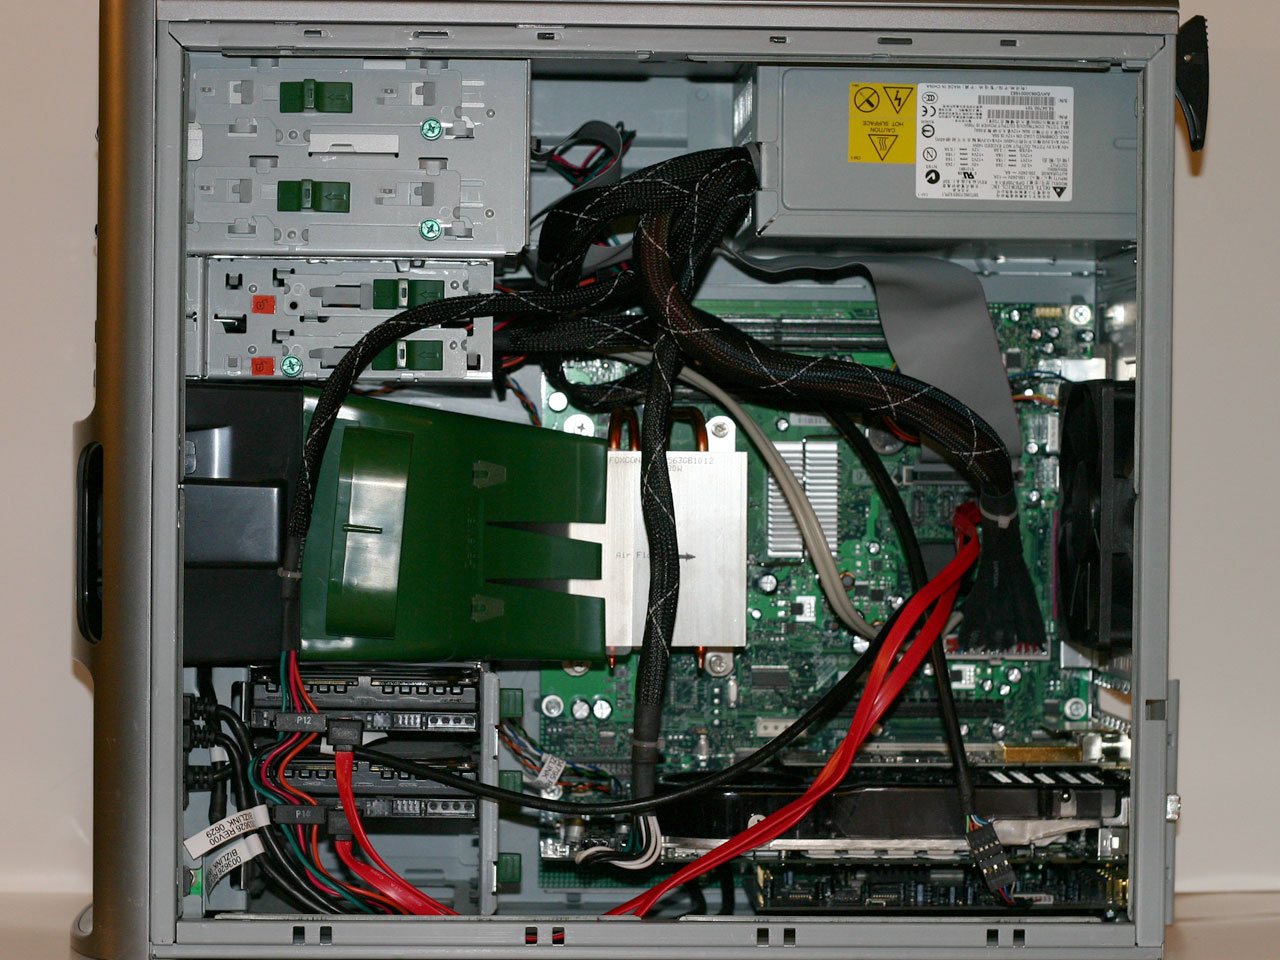
Returning to the GPUs, we have removed the support bars to get a better look. With the two large X1950 graphics cards, the TV tuner, and an X-Fi soundcard, the expansion slot area is fully utilized and somewhat cramped. It's interesting to look at the two X1950 GPUs, specifically their heatsinks, as they appear to be specially designed to fit within the system. The top CrossFire card has a heatsink and fan design that blows inward, which allows it to fit next to the large CPU heatsink. Meanwhile, the bottom X1950 XTX is a standard ATI design that vents out the rear of the case. It's also worth noting that the top GPU occupies two slot widths, but it only takes up a single expansion slot bracket, which as we mentioned earlier is part of the reason why a GeForce 8800 GPU can't fit in the top slot. However, even if there were a second expansion bracket mount open, the size of the heatsink on a GeForce 8800 would preclude it from being used, unless similar to the X1950 CrossFire card it was a special design.
We took a comparison shot of the two graphics cards alongside an 8800 GTX to give you a better idea of how the CrossFire card has been specifically designed for use in the FX530. You can also see how much larger the 8800 GTX is, and at first we weren't even sure if it would be able to fit within the system at all. With a bit of careful maneuvering, however, we did manage to fit it into the bottom X16 slot. There's not a whole lot of extra room, and the support bars can no longer be used given the location of the PCI-E power connectors. The power supply's PCI-E connectors are also a stretch to get both of them to reach the bottom graphics slot, but we did manage to make it work.
We will take a look at performance of the Gateway system with the 8800 GTX installed, along with the included X1950 CrossFire solution. In general, however, even though the CrossFire cards are faster in many situations we would prefer to have a single 8800 GTX instead of two X1950 cards in a CrossFire solution. The launch of Windows Vista has only solidified that recommendation, as both CrossFire and SLI are experiencing difficulties with the new WDDM. There have also been numerous instances since the first appearance of SLI and CrossFire where newer gaming titles weren't able to properly utilize both GPUs. Combine that with the fact that a single 8800 GTX cost less than an X1950 CrossFire solution and it includes DirectX 10 support, and out of the gate the FX530 appears to be a design in need of a graphics upgrade, at least if you're really like playing modern 3D games.
Removing the side panel to get at the interior is quite simple and takes only seconds. With the side out of the way we get our first look at the interior. Everything is relatively tidy, but the wiring standards certainly aren't up to the quality of the elite system builders. Most of the cables are left hanging, but they do not directly block any of the fans so airflow isn't impeded. That's the most important thing when looking at the internals of a case, especially when it comes to a case that holds an overclocked quad core processor.
 |
| Click to enlarge |
Some of the cables could be talked out of the way better, but having clean cables is something of a Catch-22. Having all of the cables tucked out of the way makes things look clean, but the flip side is that if you ever have to do any work on the interior of the PC, all of the tucked away cables are much more likely to cause problems than help out. If you ever have to change out components, nice wiring jobs where everything is zip-tied out of the way can be a real pain to deal with. Given that the Gateway FX530 doesn't have any windows on the side panels, having an exquisite wiring job really isn't necessary.
Gateway could have done a better job, but given the choice between better wiring and a lower price tag, we would typically opt for the cost savings and clean up the cabling ourselves if it ever presents a problem. In a sense the wiring job is a good representation of the system as a whole. It's functional and will get the job done, but it's not going to win any style awards. Some people are interested in getting an exotic PC that will stand out from the crowd, and they are interested in outward appearances rather than the bottom-line performance. The Gateway FX530 eschews form and style and focuses predominantly on functionality.
We mentioned the weight of the system earlier, and after looking at the interior you can start to get an idea of where some of the weight comes from. The two graphics cards along with the CPU heatsink are all pretty large, and additional weight is added in the form of two support bars that help to hold the graphics cards in place. The support bars do make removing your graphics cards - or any other expansion card for that matter - a bit more difficult, but they also contribute to the overall sturdiness of the case.
 |
| Click to enlarge |
At the bottom-front of the case are the three internal hard drive bays. The hard drives slide into place and are then secured by the sliding green latch on the side. This makes installing or removing hard drives simple, although the GPU support bars do make reaching the green lever a bit less convenient. Also, the hard drives tend to fit extremely snugly, so removing them does require more effort than we at first expected. Similarly, the optical drives have a latching mechanism that makes it easier to add or remove drives. Besides the latching mechanism, however, a single thumbscrew is also used to help secure each optical drive. Below the optical drives, it is possible to install a fourth hard drive above the flash memory reader, although there is less ventilation to this area and more cable clutter so it's more difficult to gain access. We would also be hesitant to install some of the warmer HDDs like the Raptors or the 750GB Seagate in such a tight space, as long-term reliability might be compromised.
You can also see in the above picture that the plastic shroud that helps direct ventilation over the CPU heatsink can be removed. Behind the shroud is a large 120mm variable speed fan. When the system is idle, it's pretty quiet all things considered. Once you start to run a few CPU intensive applications, however, the temperature controlled fans rapidly begin to speed up and make more noise.
 |
| Click to enlarge |
Helping out the front fan is a second 120mm fan at the rear of the system. Again, this reminds us of the Dell XPS 410 design, only with more processing power available. The two fans help to create a nice wind tunnel effect over the CPU and chipset area, keeping the system relatively cool without generating a whole lot of noise.
 |
| Click to enlarge |
With all of the powerful components present in the system, it's not too surprising to find a large 700W power supply feeding the beast. The power supply is manufactured by Delta Electronics, a brand that is present in many OEM desktop and laptop systems. The quality may or may not be up to the level of some of the enthusiast power supplies, but in testing we did not encounter any difficulties. The PSU has four separate 12V lines, with a combined output not to exceed 50A. Likewise, the total output on the 3.3V and 5V lines is not to exceed 140W. The power supply is rated to handle a continuous load of 700W, however, which is far more than the tested configuration is able to use.
 |
| Click to enlarge |
Returning to the GPUs, we have removed the support bars to get a better look. With the two large X1950 graphics cards, the TV tuner, and an X-Fi soundcard, the expansion slot area is fully utilized and somewhat cramped. It's interesting to look at the two X1950 GPUs, specifically their heatsinks, as they appear to be specially designed to fit within the system. The top CrossFire card has a heatsink and fan design that blows inward, which allows it to fit next to the large CPU heatsink. Meanwhile, the bottom X1950 XTX is a standard ATI design that vents out the rear of the case. It's also worth noting that the top GPU occupies two slot widths, but it only takes up a single expansion slot bracket, which as we mentioned earlier is part of the reason why a GeForce 8800 GPU can't fit in the top slot. However, even if there were a second expansion bracket mount open, the size of the heatsink on a GeForce 8800 would preclude it from being used, unless similar to the X1950 CrossFire card it was a special design.
 |
 |
| Click to enlarge | |
We took a comparison shot of the two graphics cards alongside an 8800 GTX to give you a better idea of how the CrossFire card has been specifically designed for use in the FX530. You can also see how much larger the 8800 GTX is, and at first we weren't even sure if it would be able to fit within the system at all. With a bit of careful maneuvering, however, we did manage to fit it into the bottom X16 slot. There's not a whole lot of extra room, and the support bars can no longer be used given the location of the PCI-E power connectors. The power supply's PCI-E connectors are also a stretch to get both of them to reach the bottom graphics slot, but we did manage to make it work.
 |
 |
| Click to enlarge | |
We will take a look at performance of the Gateway system with the 8800 GTX installed, along with the included X1950 CrossFire solution. In general, however, even though the CrossFire cards are faster in many situations we would prefer to have a single 8800 GTX instead of two X1950 cards in a CrossFire solution. The launch of Windows Vista has only solidified that recommendation, as both CrossFire and SLI are experiencing difficulties with the new WDDM. There have also been numerous instances since the first appearance of SLI and CrossFire where newer gaming titles weren't able to properly utilize both GPUs. Combine that with the fact that a single 8800 GTX cost less than an X1950 CrossFire solution and it includes DirectX 10 support, and out of the gate the FX530 appears to be a design in need of a graphics upgrade, at least if you're really like playing modern 3D games.
Originally published at https://www.anandtech.com/show/2169 (Wayback Machine).