
Draft N Router Coverage: When the "n" in 802.11n really means "not yet"
- Posted in
- Networking
Linksys WRT-300N
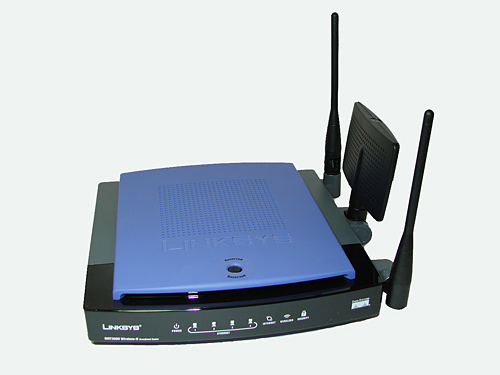
The Linksys unit has the ability to be in either a horizontal or vertical position. There is a flat paddle antenna situated in between two swivel mounted pole antennas that is 360° adjustable. With the unit vertical we thought the antenna layout reminded us of the robot on Lost in Space. We kept expecting the paddle antenna to start spinning with the two pole antennas flopping up and down while the unit beeped, "Danger, Danger, Will Robinson".
Like the other units you cannot mount it on a wall which is actually okay as the unit's performance is very sensitive to antenna adjustments. The case design continues the trademark Linksys purple and black color scheme that is starting to age compared to the recent Belkin and NETGEAR designs. The front panel features a series of clearly labeled status lights that correspond to the rear panel connections. An additional set of lights are offered that show on-line wireless activity and security status. On top is a black button that is "reserved for future use".
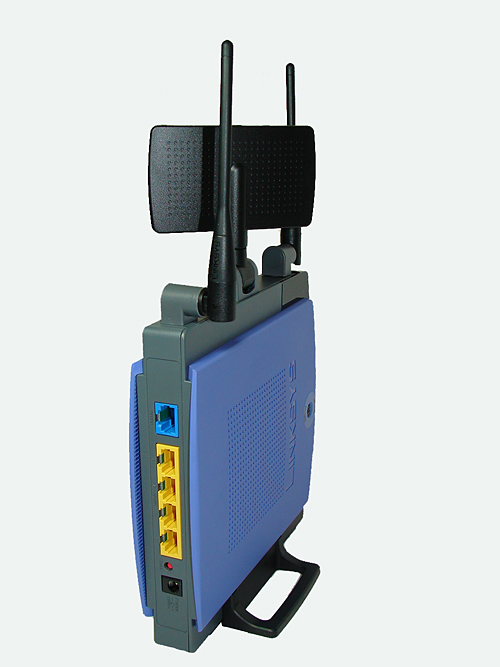
The rear panel consists of the standard connections that are labeled clearly and color coded: four 10/100 LAN ports, a WAN port, 12V power jack, and a reset button.
Linksys provides the user with a very clear and concise documentation and setup package. While not as consumer friendly as the Belkin N1 documentation, the Linksys user guide is informative and lists the basic steps to install the router and associated software. The installation process is opposite of the Belkin unit as you first install the CD; the installation wizard starts and then guides you through the process of connecting the router to your DSL or Cable modem and computer.
The next process is configuring the router settings via the browser-based configuration tool. More advanced users can simply hook up the hardware and go directly to the configuration tool by entering the router's default IP address into their browser. Our neophyte network users were able to get the Linksys system up and running with minimal assistance.
We found the Linksys configuration tool slightly difficult to use as it was the least informative in our testing. It was accompanied by a PDF based user's guide that contained less information about specific settings compared to our other two products. Linksys provides a limited three year warranty along with providing excellent technical support.
The Linksys unit has the ability to be in either a horizontal or vertical position. There is a flat paddle antenna situated in between two swivel mounted pole antennas that is 360° adjustable. With the unit vertical we thought the antenna layout reminded us of the robot on Lost in Space. We kept expecting the paddle antenna to start spinning with the two pole antennas flopping up and down while the unit beeped, "Danger, Danger, Will Robinson".
Like the other units you cannot mount it on a wall which is actually okay as the unit's performance is very sensitive to antenna adjustments. The case design continues the trademark Linksys purple and black color scheme that is starting to age compared to the recent Belkin and NETGEAR designs. The front panel features a series of clearly labeled status lights that correspond to the rear panel connections. An additional set of lights are offered that show on-line wireless activity and security status. On top is a black button that is "reserved for future use".
The rear panel consists of the standard connections that are labeled clearly and color coded: four 10/100 LAN ports, a WAN port, 12V power jack, and a reset button.
 |
| Click to enlarge |
Linksys provides the user with a very clear and concise documentation and setup package. While not as consumer friendly as the Belkin N1 documentation, the Linksys user guide is informative and lists the basic steps to install the router and associated software. The installation process is opposite of the Belkin unit as you first install the CD; the installation wizard starts and then guides you through the process of connecting the router to your DSL or Cable modem and computer.
The next process is configuring the router settings via the browser-based configuration tool. More advanced users can simply hook up the hardware and go directly to the configuration tool by entering the router's default IP address into their browser. Our neophyte network users were able to get the Linksys system up and running with minimal assistance.
We found the Linksys configuration tool slightly difficult to use as it was the least informative in our testing. It was accompanied by a PDF based user's guide that contained less information about specific settings compared to our other two products. Linksys provides a limited three year warranty along with providing excellent technical support.
Originally published at https://www.anandtech.com/show/2072 (Wayback Machine).