
HTPC - TV Tuner Reviews
- Posted in
- Smartphones
- Mobile
DVICO Fusion5 Gold (cont'd)
The Fusion5 card can function in multiple ways, and how you plan to use the card will affect the configuration process. FusionHDTV supports standard analog TV reception, OTA DTV reception, and the ability to decode digital cable content (provided that it isn't encrypted). These last two features are also referred to as the ability to decode 64/256 bit QAM content (for digital cable) and 8VSB content (for OTA DTV).
When you first launch FusionHDTV, it will ask if you want to scan for channels. Say "no" and then specify the type of connection that you're using first: cable or antenna, and then select analog, digital or both for the channel type. At this point, you can click the "Start Scan" button and wait a few minutes. (It took about 4.5 minutes to scan through the digital channels and another 1.5 minutes for the analog channels.)
Most of the configuration options are pretty much self-explanatory. You can see several of the screens above. Timeshifting is grayed out on analog channels but is available for digital channels. Depending on which station you're currently tuned in to, you may or may not be able to check the timeshifting box.
The video options allow you to specify how the content should be shown. "Original Ratio" is our preferred choice, as any form of stretching tends to look bad. Some people don't like having black areas on widescreen displays, though, so the ability to switch to a stretch or zoom mode will keep them happy. The remote actually has a button that toggles between these three modes, which can come in handy.
Digital and analog recording have separate options, although the computer speed may play a role in what you select. You can capture digital streams as either the raw transport stream (with a .TP extension) or as a "Native MPEG" stream. "Native MPEG" mode converts the transport stream to a program stream (.MPEG extension), which usually has very little impact on performance or file size (and no impact on quality). However, it can save a lot of space if you're capturing an SDTV show where there are lots of extra bytes for other subchannels or null packets in the TS that are stripped from the PS. Given this information, Native MPEG seems to be the better choice, though in our sample videos (which were of HDTV), we chose to capture the raw TS.
Analog capture only allows MPEG2 encoding, but with several quality presets available. Choosing 640x480 and Highest Quality result in a data rate of 4000 Kbits/s and little to no loss in quality, so that's what we chose. That will use around 30 MB per minute of video - that's one-fourth to one-fifth the amount of disk space as a typical 720p/1080i HD transport stream, in case you were wondering. With hard drives costing around 40 cents per GB for the best deals, we recommend grabbing a 250GB drive (or several) and using higher quality capture options rather than worrying about disk space.
The Fusion5 card can function in multiple ways, and how you plan to use the card will affect the configuration process. FusionHDTV supports standard analog TV reception, OTA DTV reception, and the ability to decode digital cable content (provided that it isn't encrypted). These last two features are also referred to as the ability to decode 64/256 bit QAM content (for digital cable) and 8VSB content (for OTA DTV).
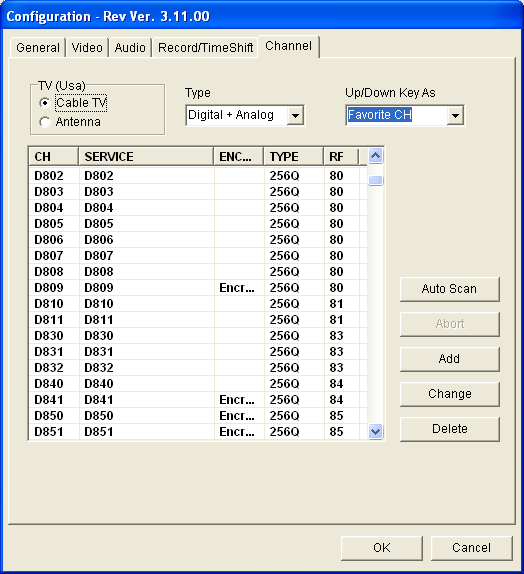
When you first launch FusionHDTV, it will ask if you want to scan for channels. Say "no" and then specify the type of connection that you're using first: cable or antenna, and then select analog, digital or both for the channel type. At this point, you can click the "Start Scan" button and wait a few minutes. (It took about 4.5 minutes to scan through the digital channels and another 1.5 minutes for the analog channels.)
 |
 |
| Click to enlarge. | |
Most of the configuration options are pretty much self-explanatory. You can see several of the screens above. Timeshifting is grayed out on analog channels but is available for digital channels. Depending on which station you're currently tuned in to, you may or may not be able to check the timeshifting box.
The video options allow you to specify how the content should be shown. "Original Ratio" is our preferred choice, as any form of stretching tends to look bad. Some people don't like having black areas on widescreen displays, though, so the ability to switch to a stretch or zoom mode will keep them happy. The remote actually has a button that toggles between these three modes, which can come in handy.
 |
 |
| Click to enlarge. | |
Digital and analog recording have separate options, although the computer speed may play a role in what you select. You can capture digital streams as either the raw transport stream (with a .TP extension) or as a "Native MPEG" stream. "Native MPEG" mode converts the transport stream to a program stream (.MPEG extension), which usually has very little impact on performance or file size (and no impact on quality). However, it can save a lot of space if you're capturing an SDTV show where there are lots of extra bytes for other subchannels or null packets in the TS that are stripped from the PS. Given this information, Native MPEG seems to be the better choice, though in our sample videos (which were of HDTV), we chose to capture the raw TS.
Analog capture only allows MPEG2 encoding, but with several quality presets available. Choosing 640x480 and Highest Quality result in a data rate of 4000 Kbits/s and little to no loss in quality, so that's what we chose. That will use around 30 MB per minute of video - that's one-fourth to one-fifth the amount of disk space as a typical 720p/1080i HD transport stream, in case you were wondering. With hard drives costing around 40 cents per GB for the best deals, we recommend grabbing a 250GB drive (or several) and using higher quality capture options rather than worrying about disk space.
Originally published at https://www.anandtech.com/show/1887/htpc-ndash-tv-tuner-reviews (Wayback Machine).