
Canon PowerShot SD300: The Best Ultra-Compact in its Class?
- Posted in
- Digital Camera
Recording Features
In all recording modes, the SD300 records images as JPEG files with quality settings: Superfine, Fine, or Normal. The resolution options are below:| Setting | Resolution (pixels) |
| Large | 2272x1704 |
| Medium1 | 1600x1200 |
| Medium2 | 1024x768 |
| Small | 640x480 |
| Postcard | 1600x1200 (Fine) |
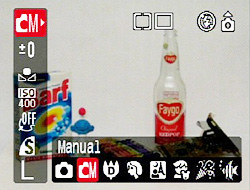
| Function Menu (Manual) | |
| Exposure Compensation | +/- 2 stops in 1/3 stop increments |
| White Balance | Auto, Daylight, Cloudy, Tungsten, Fluorescent, Fluorescent H, Custom |
| ISO | Auto, 50, 100, 200, 400 |
| Picture Effect | Off, Vivid, Neutral, Low Sharpening, Sepia, Black & White |
| Image Quality | Superfine, Fine, Normal |
| Resolution | L (2272x1704), M1 (1600x1200), M2 (1024x768), S (640x2480), Postcard (1600x1200, Fine) |
When selecting the Image Quality and Resolution, the camera will estimate how many pictures will fit on the SD card with the current setting. For example, in Manual mode, the camera indicates that we can hold 246 images at the highest quality and resolution settings on our 512MB PNY SD card.
The Digital Macro mode will use the camera's digital zoom to crop out and magnify the center of the image. Because the digital zoom degrades image quality, we recommend using the regular macro mode, which we'll discuss in a bit. Portrait mode will use a large aperture to create an image where your subject is in focus and the background is blurry. In Night Snapshot mode, the camera uses a slow-sync flash to allow ambient light to illuminate the background while the flash illuminates the subject. With Kids & Pets mode, the camera attempts to use a fast shutter speed to capture moving subjects. In Indoor mode, the camera attempts to take pictures without using the flash in order to capture natural-looking indoor images. Finally, Underwater mode is designed for use with the optional underwater casing (AW-DC30). This accessory goes for approximately $120.
In any still recording mode, a direction on the 4-way controller can be pressed to alter specific settings. The available options will vary depending on which recording mode you have selected. Below is a table that outlines all the different options:
| 4-Way Controller options | |
| Up | Light Metering (Evaluative, Center-weighted average, Spot) |
| Down | Single Image Erase/Continuous Drive/Self-timer |
| Right | Flash mode (Auto, Auto w/red-eye reduction, On with red-eye reduction, On, Off, Slow-Synchro) |
| Left | Focus (Macro, Infinity) |
With Evaluative metering, the camera measures light from the entire frame to determine the appropriate exposure. When Center-weighted metering is selected, the camera will measure light primarily in the center of the frame. With Spot metering, the camera will use a very small portion of the center of the frame to determine the best exposure. By default, the camera will show a 2-second review of an image immediately after it is taken. During the review, you can delete an image before it is written to the SD card by pressing down on the 4-way controller. In all modes except Auto, the camera can be set to continuous drive mode where it can shoot images up to 2.4 fps. The Self-timer length can be either 2 or 10 seconds; this is specified in the Setup menu. The "On" flash setting forces the camera to use the flash, even if there is already enough ambient light. Many people use this setting in sunlight to fill in shadows on a subject's face when there is strong backlighting. In Macro mode, the camera can focus on objects as close as 1.2" from the lens. When Infinity focus is selected, the camera will fix its focus to infinity for landscape pictures.
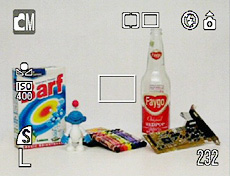 Info |
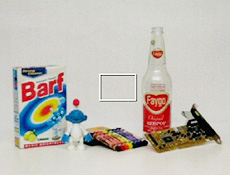 No Info. |
In any recording mode, the Disp button can be pressed to alter/disable the display. By default, the display will contain the following information: shooting mode, quality, resolution, metering, drive, flash, and number of pictures remaining. When the Disp button is pressed, the display is cleared of all information other than the live image. Another press of the Disp button will turn off the LCD to save battery power.
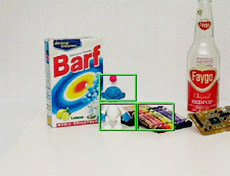 AiAF On |
AiAF Off |
With AiAF enabled (via the Setup menu), the SD300 will select one or more focus points automatically when the shutter button is half-pressed. When AiAF is disabled, the camera will always focus on the center point. With AiAF disabled, it is still possible to focus on off-center subjects. To do this, simply half-press the shutter button over your subject. Then, recompose while keeping the shutter button half-pressed. When you have the image framed as you like it, press the shutter button down all the way.
By pressing the Menu button in Manual mode, the SD300 will display 8 options under the Record section of the Menu. The options available will vary depending on the recording mode. Below, we have outlined these options as they appear in Manual mode:
| Record Menu (Manual mode) | |
| AiAF | On, Off |
| Self-timer | 10, 2 sec. |
| AF-assist Beam | On, Off |
| Digital Zoom | On, Off |
| Review | Off, 2 - 10 sec. |
| Date Stamp | Off, Date, Date & Time |
| Long Shutter | On, Off |
| Stitch Assist | Left to right, Right to left |
AiAF refers the the SD300's auto-focus system. If "On" is selected, the camera will select one or more of the 9 focus points. If "Off" is selected, the camera will always focus on the center focus point. The Self-timer amount simply specifies how long the camera will wait before taking a picture when the self-timer is enabled. The AF-assist beam is a bright red light that helps the camera to focus in low-light scenarios. To use the Date Stamp feature, you must first select Postcard (1600x1200) as the image resolution. To use a long shutter speed, you must first select "On" from the Manual mode menu. Then press the Menu button to exit the menu, press the Func./Set button and select the Exposure Compensation option. Now, press the Menu button and select a shutter speed from the following options: 1", 1"3, 1"6, 2", 2.5", 3.2", 4", 5", 6", 8", 10", 13", 15". The Stitch Assist option helps you to align panorama pictures that can later be "stitched" together using the supplied software.
To switch to movie mode, you must slide the Mode Switch to the movie mode position. Below is a table that outlines the available resolutions and frame rates:
| Resolution (Pixels) |
Frame rate (FPS) |
Maximum Length |
| 640x480 | 15, 30 | No |
| 320x240 | 15, 30 | No |
| 320x240 | 60 | Yes, 1 min. |
| 160x120 | 15 | Yes, 3 min. |
The SD300 records video clips with sound as AVI files using the M-JPEG codec. In addition to the options for resolution and frame rate, the SD300 offers the same white balance options and picture effects that are available in the still recording modes. The optical and digital zoom functions are unavailable once the camera has started recording a video clip. In movie mode, the Record menu only offers the self-timer and AF-assist lamp options.
A setup menu is available at all times through the main Menu button. Below, we have outlined the options:
| Setup Menu | |
| Mute | On, Off |
| Volume | Startup, Operation, Self-timer, Shutter, Playback (5 increments each) |
| LCD Brightness | 15 increments |
| Power Saving | Auto Power Down (On, Off) Display Off (10, 20, 30 sec., 1, 2, 3 min.) |
| Date/Time | Set |
| Clock Display | 0 - 10, 20, 30 sec., 1, 2, 3 min. |
| Format | Cancel, OK |
| File No. Reset | On, Off |
| Auto Rotate | On, Off |
| Language | Select |
| Video System | NTSC, PAL |
When "Auto Power Down" is enabled, the LCD monitor will turn off after 1 minute of inactivity (by default). This length of time can be adjusted under the "Display Off" option. The lens will retract and the camera will power down 2 minutes after the display turns off. Interestingly, when the LCD monitor turns off, it can be turned back on by simply rotating the camera to a different orientation. Otherwise, you can just press any button other than On/Off. With the option "File No. Reset" enabled, the camera will reset the file numbering system each time a new SD card is inserted. If "Off" is selected, the camera will continue the file numbering where it left off, even if a new card is inserted.
In addition to the Setup menu, there is a "My Menu" screen where you can select a startup image and operation sounds. Below is a table with the available options:
| My Menu | |
| Theme | Off, 1, 2, 3 |
| Start-up Image | Off, 1, 2, 3 |
| Start-up Sound | Off, 1, 2, 3 |
| Operation Sound | Off, 1, 2, 3 |
| Self-timer Sound | Off, 1, 2, 3 |
| Shutter Sound | Off, 1, 2, 3 |
The Theme options allow you to select themes 1, 2, or 3 that correspond to a specific startup image and operating sounds. Options 1 and 2 of each section are customizable. For example, by selecting "2" as the Start-up Image option, you can press the Disp. button to select your own image. Likewise, you can record or select your own sounds for each of the sound options. These custom settings are saved to the camera's memory, so they are available even after the SD card is formatted.
Originally published at https://www.anandtech.com/show/1623 (Wayback Machine).