
Digicam Roundup: $150
- Posted in
- Digital Camera
Recording Features
In all recording modes, the D-540 records images as JPEG files. Only the highest resolution setting has a quality option (SHQ/HQ). The resolution options are below:| Setting | Resolution (pixels) |
| SHQ/HQ | 2048x1536 |
| SQ1 | 1600x1200 |
| SQ2 | 640x480 |
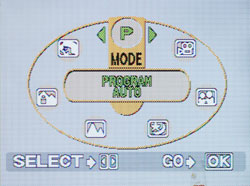
Virtual Dial
To select a recording mode, you must press the left arrow button. The camera then presents a "Virtual Dial" that displays all the possible recording modes. The available recording modes are: Program Auto, Portrait, Landscape + Portrait, Landscape, Night Scene, Self Portrait, and Movie. To cycle through the options, you must press the left/right arrow buttons to rotate the dial clockwise/counterclockwise. After positioning the desired mode at the top, simply press the OK/Menu button to select it. Program Auto is considered a general purpose shooting mode and is recommended for casual shooting. In Portrait mode, the camera uses a large aperture to keep the subject in focus while blurring the background. In "Landscape + Portrait" mode, the camera attempts to focus on both the subject and the background. With Landscape mode, the camera uses a small aperture to keep the foreground and background in focus. With Night Scene mode, the camera uses a slow shutter speed to capture scenes lit by low levels of light. If the flash is enabled, the camera will first fire a flash to illuminate the subject. Then, the shutter will stay open to gather ambient light. The result is a natural, well-balanced night picture with both foreground and background detail. With Self-portrait mode selected, the camera fixes the zoom at wide angle, allowing you to take a picture of yourself.
In most of the still recording modes, there are several options available to the user. For example, the flash mode can be selected by pressing the right arrow button. The options are Auto, Red-eye, Fill-in, and Off. Fill-in flash mode forces the camera to use the flash even if there is enough light without it. This can be useful, for example, in an outdoor shot where a subject's face is covered in shadows. Additionally, macro mode can be enabled by pressing the up arrow button. With the standard macro mode, the camera can focus as close as 7.9" from the subject. However, there is also a "Super Macro" mode available in the "Camera Menu" discussed below.
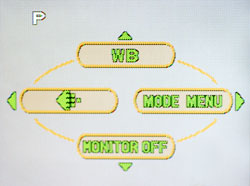
Main Menu
By pressing the OK/Menu button, four main sub-options will appear: Quality, White balance, Mode Menu, and Monitor Off. The Quality option simply displays a screen where you can select the recording resolution and quality option desired. Selecting the white balance option brings up a screen with the following options: Auto, Sunlight, Overcast, Tungsten, and Fluorescent. Selecting the Mode Menu option brings up three additional menus: Camera, Card, and Setup. The options are detailed below:
| Camera Menu | |
| Exposure Compensation | +/- 2 stops in 1/2 stop increments |
| Digital Zoom | Off, On |
| Super Macro | Off, On |
| Drive | Single, Continuous |
| Panorama | Select |
The Super Macro option fixes the lens at wide angle and enables the camera to focus as close as 0.8" from the subject. If the drive mode is changed to continuous, the quality setting is changed automatically to SQ2 (640x480). The camera is then able to shoot approximately 12 frames at 1.5 fps. The Panorama option is only available with an Olympus xD-Picture Card. The camera helps you to take pictures, which can be stitched into a panorama with the bundled software. The Card menu only has one option called "Card Setup". Selecting this option allows you to format the flash card.
| Setup Menu | |
| All Reset | Off, On |
| Digital Zoom | Select |
| Rec View | Off, On |
| File Name | Reset, Auto |
| Pixel Mapping | Start |
The option, All Reset, refers to whether or not the camera will remember the current settings the next time that it is powered on. With "Rec View" enabled, the camera will briefly display a picture immediately after it is taken. Selecting "Reset" from the File Name option causes the camera to reset its file naming sequence. Pixel Mapping is designed to fix "hot" or "stuck" pixels, which can appear as brightly colored pixels in the image. In the user's guide, Olympus recommends performing Pixel Mapping once a year.
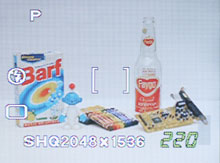 Typical record display |
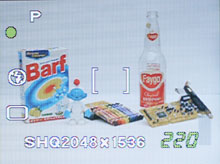 Locked focus |
In any still recording mode, the D-540 will display two brackets that indicate the focus point. To lock focus on an object, you simply position the brackets over your subject and half-press the shutter button. If focus is successful, a steady green dot will appear at the upper-left corner of the LCD monitor. If focus fails, the green dot will blink. To focus on an off-center subject, simply half-press the shutter button while the center brackets are over your subject. Then recompose the shot and press the shutter button down fully.
Movie mode on the D-540 is capable of recording at either 320x240 or 160x120 at 15 fps. The video clips are recorded as QuickTime MOV files with no sound and the duration of the clips is only limited by the remaining available flash card space. For being a point-and-shoot camera, the D-540 offers some advanced options for its video capability. For example, the optical and digital zoom can be used while recording. In addition, exposure compensation and white balance can be adjusted prior to recording.
Originally published at https://www.anandtech.com/show/1579 (Wayback Machine).