
Photosmart M307: HP's Newest is Put to the Test
- Posted in
- Digital Camera
Recording Features
In all recording modes, the M307 records images as JPG files. Only the highest resolution setting offers an option for quality (Best, Normal). Below is the full list of resolution/quality options:| Resolution (pixels) | Quality |
| 2048x1536 | Best, Normal |
| 1280x960 | N/A |
| 640x480 | N/A |
The M307 offers 7 still recording modes in addition to a video recording option. The 7 still modes are Auto, Macro, Fast Shot, Action, Portrait, Landscape, and Beach & Snow. Auto mode is a general purpose shooting mode where the camera decides all of the shooting settings for you. In Macro mode, you can focus on objects as close as 4 inches from the lens. Fast Shot mode fixes the camera's focus at infinity so that you can take pictures without the delay of focusing. In Action mode, the camera uses a fast shutter speed automatically and high ISO setting to capture fast moving subjects. With Portrait mode, the camera will use a large aperture to blur the background while keeping your subject in focus. Landscape mode uses the opposite (i.e. a small aperture) to keep the foreground and background in focus. In Beach & Snow mode, the camera attempts to avoid underexposing bright scenes by compensating the exposure automatically. In Auto, Macro, and Beach & Snow modes, you have access to all the Capture Menu options. In the other modes, the option to adjust the ISO setting is unavailable. The LCD can be toggled on or off by pressing the "Live View" button. Below is a typical display in record mode.
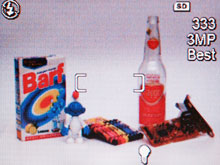
Typical display - Auto mode
By pressing the Timer/Burst button, the M307 can be set to record in one of the following drive modes: Normal, Self-timer, Self-timer 2 Shots, and Burst. With Self-timer mode, the camera will wait 10 seconds before taking the picture. The option "Self-timer 2 Shots" simply takes an additional picture a few seconds after the first. In Burst drive mode, the camera can take up to 4 pictures as long as the shutter button is held down. The LCD display is disabled during shooting. If the shutter button is held down past 4 images, the camera will continue to take pictures at a slower rate until the memory card is full.
In Auto recording mode, the flash mode is set to Auto Flash by default. However, by pressing the Flash button you can cycle through the following additional flash options: Red-eye, Flash On, Flash Off, and Night. The option "Flash On" forces the camera to use the flash even if the camera's exposure system deems it unnecessary. By using this option, you can use the flash to fill in shadows on subjects created by harsh lighting situations (such as backlighting). With the Night option, the camera uses red-eye reduction and a slow-sync flash to capture the shot. Slow-sync is when the camera fires a flash and then continues to expose the scene to allow ambient light to fill in the background. Use of a tripod is highly recommended for night pictures due to the extended exposure. In Fast Shot mode, the flash is disabled and there are no options to enable it. In all other recording modes, all five flash options are available.
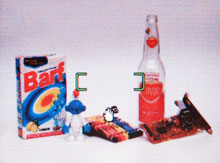 Focus locked |
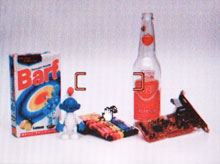 Focus failed |
When the shutter button is half-pressed, the camera will attempt to focus on the object located between the auto-focus brackets seen on the LCD monitor. If focusing is successful, the AF brackets turn green and the AF indicator lamp lights to indicate that focus has been achieved. If focus cannot be achieved, the AF indicator lamp will blink and the brackets will turn red. Even if focus is not achieved, the camera will still allow you to take a picture by pressing the shutter button down fully. In Macro mode, focus works in a similar way except that the camera will not permit you to take a picture that is not focused.
To perform an optical zoom, you can hold down the telephoto end of the zoom controller. At the limit of the 3x zoom, the lens will stop moving. At this point, to perform a digital zoom, you must release the zoom controller and press it again. Since the digital zoom essentially crops the image for you, the new image resolution will be displayed on the LCD monitor as you zoom digitally (e.g. "1.4MP").
In all recoding modes, there are some common options available in the Capture Menu. This menu can be accessed by pressing the Menu/Ok button in any recording mode. Exposure Compensation can be set to +/- 2 stops in 1/2 stop increments. The image quality options that we discussed at the top of the page are also available in the menu. White Balance can be set to Auto, Sun, Shade, Tungsten, or Fluorescent. There are 3 different color options: Full Color, B&W, and Sepia. Also, there is an option to imprint either the Date or Date & Time in the lower-left corner of each picture. As we mentioned earlier, shooting modes Auto, Macro, and Beach & Snow have an option for ISO adjustment. The available settings are Auto, 100, 200, and 400.
The M307 offers the option of recording an audio clip along with pictures. The audio clip can be recorded at the time that the picture is taken or later in playback mode. To record a clip when taking a picture, simply continue to hold down the shutter button after taking a picture. There is no limit to the length of the clip other than the available remaining space on your flash card/internal memory. The audio clip is embedded in the JPEG file, making it difficult or impossible to play back without using the bundled software. We should also point out that the camera does not have a built-in speaker, so you can't even listen to the audio on the camera without using the optional dock. Most other cameras simply save audio clips as separate files, making them easier to deal with. You can press the HP Instant Share button at any time to get to the Instant Share menu. Here, you can tag images for printing or emailing later.
Movie Mode
Movie mode on the M307 is pretty basic. To start recording a video clip, simply press the "Video" button next to the shutter button. The camera sets the focus automatically to infinity. Video clips are recorded as MPEG1 files at 30fps and 320x240 with sound. Both optical and digital zooming are disabled during recording. The camera allows you to select white balance and color settings for the video. Also, the video clips are only limited by the available space remaining.This camera has an extensive help system built into the camera. Every setting in the menu includes a help option. By selecting a "help" option, you are presented with at least one paragraph describing the purpose of the relevant menu item. Additionally, the M307 has an entire Help section in the menu with 14 help topics from "Top Ten Tips" to "Using Shooting Modes" to "Camera Shortcuts". This level of on-camera assistance goes far beyond what we've seen on other cameras and we think some people may find it useful.
The Setup menu offers some options to adjust basic camera operation. Below is a table outlining these options:
| Setup menu | |
| Display Brightness | Low, Medium, High |
| Camera Sounds | Off, On |
| Live View Setup | Off, On |
| Date & Time | Set |
| USB | Digital Camera, Disk Drive |
| TV Configuration | NTSC, PAL |
| Language | Select |
| Move Images to Card | Cancel, Yes |
Most of these are pretty straightforward. The "Live View Setup" option refers to whether or not the camera should start up with the LCD monitor on or off by default. The option "Move Images to Card" will move any images that are stored on the internal memory to a flash card.
Overall, the Photosmart M307 offers all the basic recording features that you would expect from an entry-level point-and-shoot camera. You have a fully automatic recording mode and a handful of preset options as well. The video mode doesn't look too promising, but we aren't expecting much from a camera in this price range. We should point out that we are disappointed that audio clips are embedded in JPEG files. This really limits the possibilities of what you can do with the audio later on. However, in general, we think that the M307 offers a good set of recording options and we are pleased to see that a half-press of the shutter button will automatically exit any menu currently open to get the camera ready to shoot.
Originally published at https://www.anandtech.com/show/1554 (Wayback Machine).