
Gigabyte GN-WMAG01
- Posted in
- Networking
Installation and Configuration
Installation of the WMAG01 in our Windows XP laptop was simple. Insert the card into a free slot in your laptop and wait for the "Found New Hardware Wizard" to appear. Windows 2000 and XP should detect the WMAG01 as an unknown Ethernet Controller.
Click to enlarge.
Next, we choose the "Install from a list or specific location (Advanced)". We pointed the wizard to the "%CDROM_DRIVE_LETTER%\Inf\WinXP" for the drivers.

Click to enlarge.
After waiting a couple of seconds for Windows to copy the files, the installation process was complete. If the installation was successful, you should see a screen like this:

Click to enlarge.
In addition to the drivers, the software CD contains a wireless LAN utility to configure the wireless NIC. We recommend this over Windows XP's built-in "Wireless Zero Configuration".
Installing the LAN utility was just as easy. Insert the software CD into the laptop and if "autorun" is enabled, wait for the splash screen to appear. Choose the "Install Wireless LAN Utility" option and wait a couple of minutes. One minor complaint about the installer itself is that there is no confirmation prompt or any other input from the user. Once you click on the link, the software installs automatically.
The wireless LAN utility has 5 information tabs for Link Status, Site Survey, Configuration, Statistics, and Driver Info. The Link Status shows the status of the WMAG01, whether or not it is associated with an AP and additional hardware information. There are also two colored signal bars that represent the transmit and receive signal strengths. Statistics of the number of packets, speed, and a graph round out the rest of the information that is displayed.

Click to enlarge.
Next is the Site Survey; the bottom information box lists all visible APs. For each AP listed, the MAC ID of the AP, security status, signal strength, channel, and wireless mode are displayed. To connect to an AP, just double-click on any of the listed APs and a profile configuration screen will ask you to configure the settings for that particular AP.

Click to enlarge.

Click to enlarge.
Modifying or creating a new profile will present a Profile Management dialog box with 3 tabs for configuring the WMAG01 to be used with an AP. The General tab is where the profile name and the SSID(s) are entered.

Click to enlarge.
The next Profile Management tab, Security, is where the different security methods can be selected and configured. The WMAG01 supports all the current security methods from open system to WPA and WPA-PSK.

Click to enlarge.
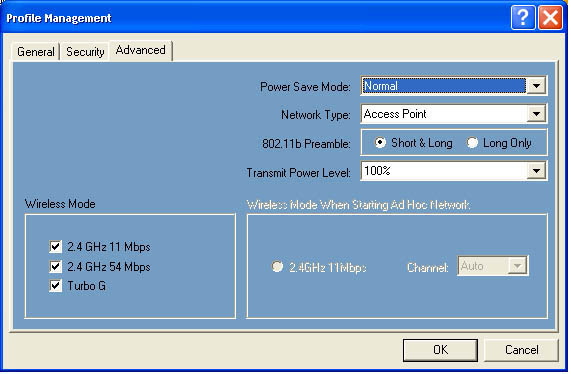
The final Profile Management tab, Advanced, is where you can configure miscellaneous options such as power save mode, network type, and wireless mode.
Click to enlarge.
Back to the LAN utility itself, the Statistics tab displays a detailed list of transmit and receive statistics.

Click to enlarge.
The final tab displays the card name, MAC ID, and the date, versions, and file name of the driver.
Overall, the wireless LAN utility from Gigabyte is very easy to use and to configure. The only minor complaint is with the help file. Either a better translator or someone with better technical writing skills is required.
Originally published at https://www.anandtech.com/show/1475 (Wayback Machine).