
Thermaltake Armor A30 Case Review: Opening the Puzzle Box
Assembling the Thermaltake Armor A30
Due to the Thermaltake Armor A30's "modular" design, you wind up essentially putting it together in pieces. That seems like a good plan right up until you get to cabling, at which point everything just flies out the window because the traditionally easiest way to cable a small form factor case like this one (slipping your hands in the sides) is impossible. For assembly and testing, note that we used our Mini-ITX testbed again as opposed to our Micro-ATX bed. The reason for this is that the Micro-ATX testbed's tower cooler is simply too tall; the power supply installs directly above the CPU in the A30, taking tower coolers out of the equation. I still pushed the case pretty hard with our GeForce GTX 560 Ti, though.
After removing the top panel, six thumbscrews are removed to slide the motherboard tray out of the back of the case. Even installing the I/O shield proved to be a minor nuisance, as there are studs behind the opening that force you to slide it in laterally and then snap it forward instead of being able to just pop it in. And while one would think a modular tray would make this part easier since you can wrap your hands around the sides, it actually makes it more difficult because there's very little bracing the back of the tray for when you apply pressure to the shield.


Installing the board itself was easy, but then wiring becomes an issue. The case headers are a decent length, but not really long enough to connect them all before you slide the tray back in. That means removing the power supply bracket and all seven screws there. Again, all of this would've been immeasurably easier if Thermaltake had simply designed the case's side panels to come off.
Removing the drive cages was fairly easy, but the front of the case's interior is just kind of a mess. The internal 3.5" drive cage risks pushing the header cables into the blades of the front 90mm intake fan, the gap between the 5.25" drive bays (even in the removable cage) makes lining them up more difficult than it needed to be, and the toolless mechanism used for mounting 2.5" drives to the top of the cage is not secure.
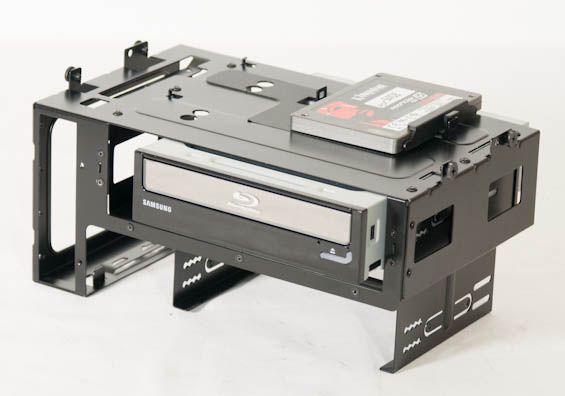
While the external 5.25" drive cage is mostly fine, mounting 2.5" drives to the top of the case involves inserting a plastic hinge into one side of the drive, then lining it up with two studs on the top of the cage and snapping it into place. The snap comes open pretty easily, and I wouldn't use a mechanical drive in either of the 2.5" slots. Irony: the one part of the A30's design that's genuinely toolless is the same one that invariably requires tools in most other cases.
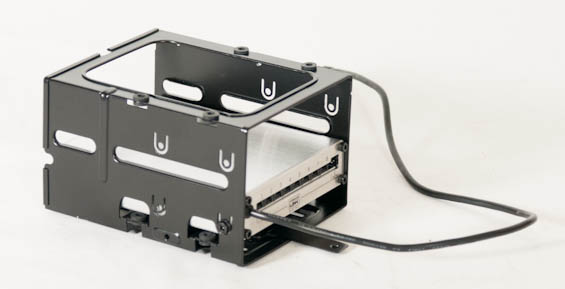
The internal 3.5" drive cage feels pretty backwards, though. Half an allowance is made towards mounting 3.5" drives using side screws, but our Corsair Link unit has no bottom screw points, making it hang slightly in the cage. Some of this has to do with Corsair's awkward mounting design for the Link box, but was there any reason not to include all three side mounting holes in the cage?
Installing the power supply is actually pretty easy once you've got the cage out since it offers ample support for the underside. I was unsure of which way to orient the PSU initially; I don't like having the intake above the CPU the way it is. However, the top fan of the A30 is an exhaust, so flipping the PSU would sandwich two exhausts against each other. In the end the PSU was oriented with the intake on the bottom.
As for expansion cards, if your PCIe x16 slot is the topmost you should be fine going past the 9.5" spec I outlined in the table at the beginning of this review, but otherwise you're going to run into the cage for the 3.5" external bay.
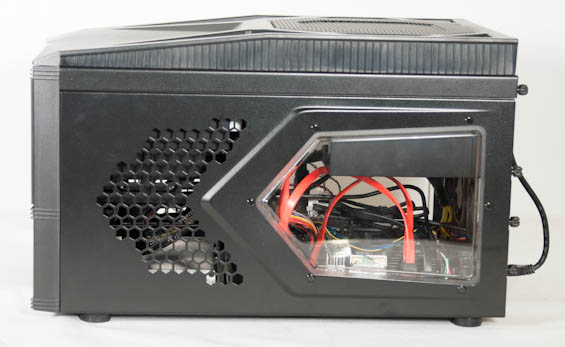
Cabling the A30 without being able to get in from the sides was nightmarish, though. I'm fortunate that I have small hands and wrists, and slender fingers, because if I were the size of the average man I'd have been tremendously frustrated. There's a lot of fishing around the interior and a lot of shoving cables without actually really seeing where they're going. I worried tremendously that the power cables for the two 60mm exhaust fans would dip into the fan blades of the CPU heatsink, or that other cables would get stuck in the 230mm fan (this did happen at one point), or that the front leads would get caught in the fan blades of the 90mm front intake fan.
Assembling the A30 is needlessly complex and could've been drastically simplified in a few ways. First, make the motherboard tray part of the frame instead of removable. Second, use a steel frame to support the top-mounted cages instead of the side panels themselves and make the side panels removable. Third, keep the top panel removable. Fourth, reduce the number of screws holding the power supply cage in place to three: two on top, one on the back. Fifth, condense the drive cages into one major cage. Do so by stacking the two 5.25" drive bays on top of each other, and then include the pair of internal 3.5" drive bays in the bottom of the cage itself beneath those two drive bays. Sixth, use a more secure mounting mechanism for the 2.5" drives.
Originally published at https://www.anandtech.com/show/6327/thermaltake-armor-a30-case-review-opening-the-puzzle-box (Wayback Machine).