
BitFenix Shinobi: The Budget Ninja
Assembling the BitFenix Shinobi
Actually building our testbed into the BitFenix Shinobi proved to be remarkably painless. Everything about the building experience from start to finish screamed polish, although there were hiccups here and there (nothing is ever trouble free). One thing I appreciated tremendously was the instruction manual included: it's not perfect, but for the most part instructions are clear, simple, detailed, and written in perfect English.
The side panels are affixed with thumbscrews and are easy enough to remove. You'll want to remove both, too, as there's a healthy amount of space behind the motherboard tray for routing cables and the tool-less hard disk mounting mechanisms need to be attached to both sides of the drive.
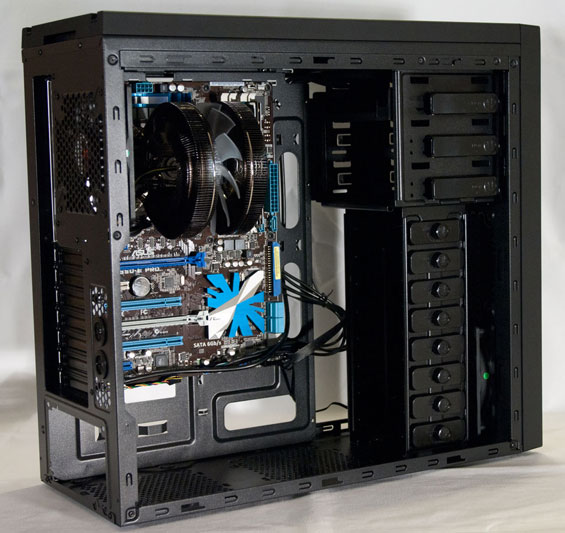
Installing the motherboard is the standard process, involving manually screwing standoffs into the tray. BitFenix only ships the Shinobi with two standoffs pre-installed, and I have to be honest here: this is one aspect of assembly where everything has largely standardized at this point. It's a small nuisance but a nuisance nonetheless. Nonetheless, once the standoffs are installed, putting the I/O shield and the motherboard in is painless and easy. You'll see that word "painless" come up again and again and that's because with the Shinobi it's true: this is an exceptionally easy case to work with.
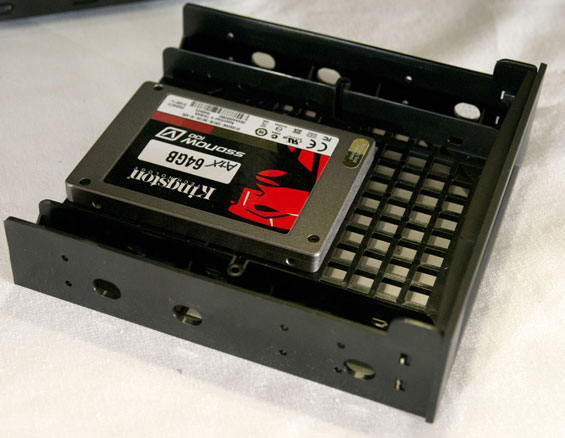
Things get a little bit confusing initially with the drive installation, but once you know what you're looking at, everything's right as rain again. The 5.25"-to-3.5"-to-2.5" adapter tray comes pre-installed behind the top 5.25" bay shield; to remove it you have to actually take the front of the case off. That's not too difficult and requires only a reasonable application of force. From there it just slides out. The adapter tray comes with two sets of screw notches: one for using it internally, and the second for using it externally. It's a slick solution; you can easily hide it behind a drive bay shield if you're just using it to mount an SSD. Plastic clasps are used on one side to secure 5.25" drives in place; I found the adapter to be a little too loose for my liking in its bay, but the optical drive we use didn't budge once the clasp was snapped in, and it lined up perfectly.
Installing 3.5" drives is incredibly simple. Twist the knob on the clamp and it pops off of the cage. Do the same to the clamp on the other side. Then slide your drive in, line it up with the screw holes, pop the clamp back in and twist it back to the "lock" position (helpfully marked on the clamp itself). Like the 5.25" adapter bay it's not 100% secure, but it's close enough not to worry about it or drive vibration creating noise or reducing the lifespan of the drive.
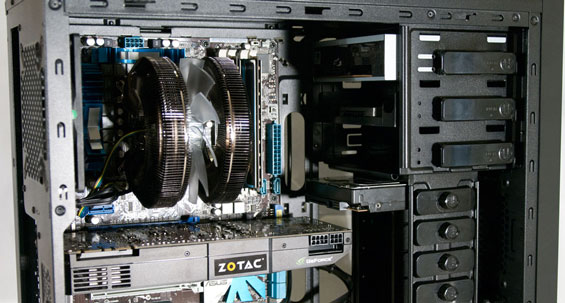
It's here that you'll discover the first potentially serious clearance problem of the BitFenix Shinobi, though. A high-end video card is liable to butt up against the back of a hard drive and prevent you from connecting the cables to it, so this means you'll lose at least one or two drive bays in the process. I also discovered that the way I'd installed the hard drive and the video card effectively created a barrier between the front intake fan and the rest of the components inside the case. This is the configuration I used for testing, and it might have been a little unfair since it's clearly not the ideal arrangement, but it's not an unusual one either: doing this allowed me to use just one power lead for connecting all of the drives, thus reducing cable clutter.
Speaking of which, is this case ever excellent for minimizing cable clutter. Installing the power supply and wiring everything was about as easy as I could expect, with the mounting holes in the motherboard tray working perfectly and a healthy amount of breathing room between the back of the tray and the side panel. I didn't actually even need to use the included zip-ties to keep everything in place.


Of course, there were still some hassles in the assembly. The AUX 12V line proved once again to be extremely difficult to connect; this is a situation where adding a half inch or so of height to the Shinobi would've given the top of the motherboard enough clearance for you to route that cable all the way up to the top, and also create enough clearance to use a 240mm radiator and water-cooling solution, something you can't do with the Shinobi as is.
Also, understanding the window on the case is to help you display your internals, coloring all of the case header leads black is nearly as ridiculous an idea here as it was in the NZXT H2. It's not worth it. I was able to get them connected and working properly on the first try, but I'd just as soon not play guessing games trying to figure out which side is the positive and which side is the ground.
Originally published at https://www.anandtech.com/show/4460/bitfenix-shinobi-the-budget-ninja (Wayback Machine).