
abit IP35-Pro: Houston, We Have a Winner
- Posted in
- Motherboards
abit IP35-Pro: Board Layout and Features
The abit engineers spent the proper amount of time on the layout of this board. The color scheme is simple and almost elegant when comparing it to some of the Crayola color schemes we have seen in the labs. The board was a snap to install in our Antec P180 and Cooler Master 830 cases with most connections easily reached. The board features a high quality four-phase voltage regulator system that provided excellent stability throughout testing. The board also utilizes Conductive Polymer Aluminum Solid Capacitors.
The IP35-Pro comes with six fan headers (1 x 4-pin, 5 x 3-pin) that provided an excellent balance of cooling options. Control of the individual fan headers is available via the BIOS and the µGuru program within Windows. Each header type has the three options of monitoring and control settings within the BIOS. abit utilizes a well-engineered heat pipe system for cooling the MCH, ICH, and PWM component areas.
Engineering can only take you so far, and unfortunately the execution is not always up to standards. Out of the three boards we tested, two had problems with the heatsink properly making contact on the PWM components and the MCH heatsink was not completely flat. A quick Google search will lead you to a forum user who "fixed" this problem. We tried it on one of our boards and noticed the MCH temperatures dropped 5C while PWM temperatures dropped over 9C when overclocking the board.
Around the CPU socket area, we find an ample amount of room for the majority of cooling solutions. We utilize the stock heatsink/fan in our base testing but also installed several aftermarket Socket-775 cooling solutions such as the Tuniq 120 and Thermalright Ultra 120 eXtreme during our overclocking tests. However, based upon our initial overclocking tests, if a vertical mounted fan in an air cooling unit such as the Tuniq 120 or water-cooling is utilized then additional air cooling will be required on the MCH and PWM areas. In other words, the heat pipe system works best with a downward blowing CPU HSF fan in mind.
The 8-pin ATX power connector is located on the edge of the board behind the PS/2 ports and did not interfere with our various cooling units. It is easy to remove the heat pipe system if you wish to water cool the MCH/ICH chipsets or perform the PWM heatsink mod.
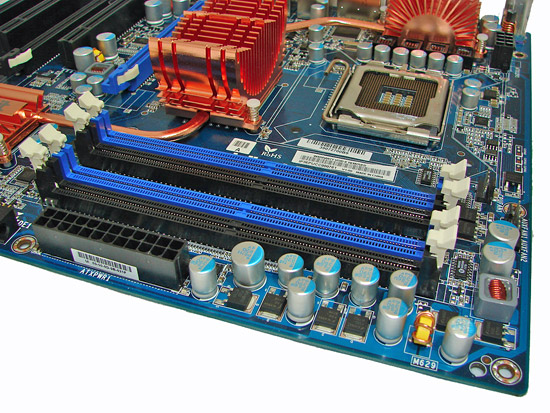
The DIMM module slots' color coordination is correct for dual channel setup based upon the premise of installing DIMMs in the same colored slots for dual-channel operation. Installing memory modules will not be a problem, even with a full-size video card in the first PCI Express x16 slot. The 24-pin ATX power connector is located on the edge of the board along with the number three system fan header.
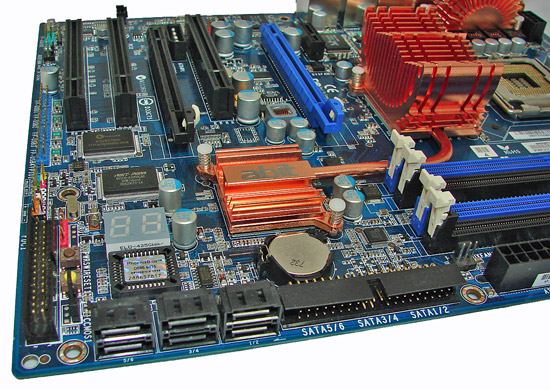
We found the positioning of the six black ICH9R SATA ports to be excellent when utilizing the expansion slots, as they are out of the way of most long cards. The ICH9R chipset uses passive cooling and was reasonably cool to the touch throughout testing. To the right of the SATA ports is the IDE connector and battery.
In a nod to those users who run their systems on an open platform or get tired of hooking up the chassis panel connections, abit has added power on and reset buttons on the board. These buttons have always been useful for us and should be standard on any board in this market segment. Of course, a POST Code Debug LED is included in typical abit style and the floppy drive connector is located next to it.
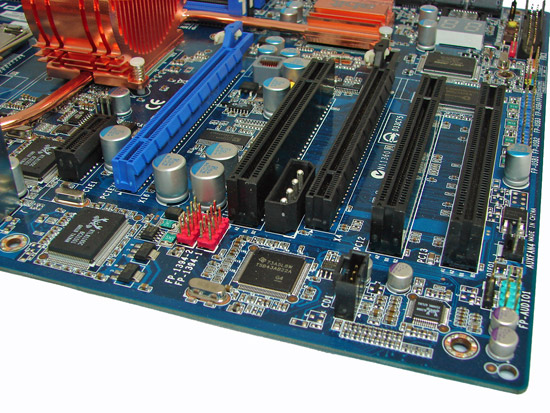
The board comes with two physical PCI Express x16 connectors (1 x16, 1 x4 electrical), one PCI Express x1 connector, and three PCI 2.3 connectors. A dual slot graphics card will block the second PCI slots. Several cards we tried in the PCI Express x1 slot had a tight fit with our 2900XT card installed. A 4-pin 12V Molex connector is to the right of the first PCI slot; CrossFire configurations (or systems where all of the expansion slots are populated) should use this extra power connector.
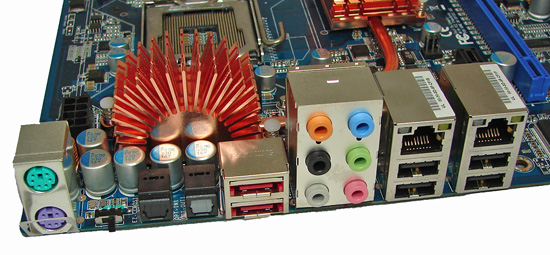
The rear panel contains the standard PS/2 mouse and keyboard ports. The panel also includes two RJ-45 LAN ports with activity indicator lights, four USB ports, and optical in/out S/PDIF ports. The audio panel consists of six ports that support 2, 4, 6, and 8-channel audio connections for the Realtek ALC888 HD codec. Finally, there are two eSATA ports along with a handy clear CMOS switch.
 |
The abit engineers spent the proper amount of time on the layout of this board. The color scheme is simple and almost elegant when comparing it to some of the Crayola color schemes we have seen in the labs. The board was a snap to install in our Antec P180 and Cooler Master 830 cases with most connections easily reached. The board features a high quality four-phase voltage regulator system that provided excellent stability throughout testing. The board also utilizes Conductive Polymer Aluminum Solid Capacitors.
The IP35-Pro comes with six fan headers (1 x 4-pin, 5 x 3-pin) that provided an excellent balance of cooling options. Control of the individual fan headers is available via the BIOS and the µGuru program within Windows. Each header type has the three options of monitoring and control settings within the BIOS. abit utilizes a well-engineered heat pipe system for cooling the MCH, ICH, and PWM component areas.
Engineering can only take you so far, and unfortunately the execution is not always up to standards. Out of the three boards we tested, two had problems with the heatsink properly making contact on the PWM components and the MCH heatsink was not completely flat. A quick Google search will lead you to a forum user who "fixed" this problem. We tried it on one of our boards and noticed the MCH temperatures dropped 5C while PWM temperatures dropped over 9C when overclocking the board.
 |
Around the CPU socket area, we find an ample amount of room for the majority of cooling solutions. We utilize the stock heatsink/fan in our base testing but also installed several aftermarket Socket-775 cooling solutions such as the Tuniq 120 and Thermalright Ultra 120 eXtreme during our overclocking tests. However, based upon our initial overclocking tests, if a vertical mounted fan in an air cooling unit such as the Tuniq 120 or water-cooling is utilized then additional air cooling will be required on the MCH and PWM areas. In other words, the heat pipe system works best with a downward blowing CPU HSF fan in mind.
The 8-pin ATX power connector is located on the edge of the board behind the PS/2 ports and did not interfere with our various cooling units. It is easy to remove the heat pipe system if you wish to water cool the MCH/ICH chipsets or perform the PWM heatsink mod.
The DIMM module slots' color coordination is correct for dual channel setup based upon the premise of installing DIMMs in the same colored slots for dual-channel operation. Installing memory modules will not be a problem, even with a full-size video card in the first PCI Express x16 slot. The 24-pin ATX power connector is located on the edge of the board along with the number three system fan header.
We found the positioning of the six black ICH9R SATA ports to be excellent when utilizing the expansion slots, as they are out of the way of most long cards. The ICH9R chipset uses passive cooling and was reasonably cool to the touch throughout testing. To the right of the SATA ports is the IDE connector and battery.
In a nod to those users who run their systems on an open platform or get tired of hooking up the chassis panel connections, abit has added power on and reset buttons on the board. These buttons have always been useful for us and should be standard on any board in this market segment. Of course, a POST Code Debug LED is included in typical abit style and the floppy drive connector is located next to it.
The board comes with two physical PCI Express x16 connectors (1 x16, 1 x4 electrical), one PCI Express x1 connector, and three PCI 2.3 connectors. A dual slot graphics card will block the second PCI slots. Several cards we tried in the PCI Express x1 slot had a tight fit with our 2900XT card installed. A 4-pin 12V Molex connector is to the right of the first PCI slot; CrossFire configurations (or systems where all of the expansion slots are populated) should use this extra power connector.
The rear panel contains the standard PS/2 mouse and keyboard ports. The panel also includes two RJ-45 LAN ports with activity indicator lights, four USB ports, and optical in/out S/PDIF ports. The audio panel consists of six ports that support 2, 4, 6, and 8-channel audio connections for the Realtek ALC888 HD codec. Finally, there are two eSATA ports along with a handy clear CMOS switch.
Originally published at https://www.anandtech.com/show/2367 (Wayback Machine).