
Coolpix 4100: 4 Megapixel Entry-level Nikon for Under $200
- Posted in
- Digital Camera
Playback Features
To review previously taken pictures/videos, simply press the Play button. The camera can be powered on directly in Play mode by holding the Play button while pressing the power button. Press left/right or up/down on the multi-selector to move to different images.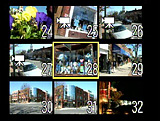 Image thumbnail view |
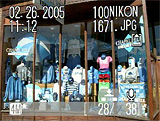 Image regular view |
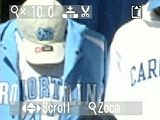 Image magnified 10x |
By pressing the wide end of the zoom controller, a 2x2 thumbnail screen will appear. Another press of the wide end of the zoom rocker will switch to a 3x3 thumbnail display. Conversely, by pressing on the telephoto end of the zoom controller, you can magnify an image in 29 increments up to 10x. To move around to different parts of the image, simply use the 4-way multi-selector. While an image is magnified, the image can be cropped by pressing the shutter button. When the shutter button is pressed, the LCD will display "Save this image as displayed?" If "Yes" is selected, the camera will save a cropped version of the image as a new file. While an image is being viewed full-screen, a voice memo can be recorded by holding down the shutter button. Audio clips are limited to 20 seconds in length and are recorded as WAV files with the same file number as the image. Video clips can be viewed at normal speed or frame-by-frame. You can also fast-forward or rewind through a clip.
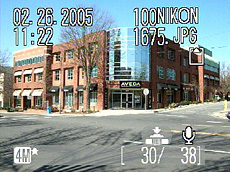 Information on |
 Information off |
By adjusting the "Monitor settings" option in the Set up menu, the LCD can vary the amount of information displayed. When it is set to "Show info", the LCD will display the following information: resolution/quality, number out of total, date, time, folder, filename, file location (flash card/internal), and auto transfer. When the monitor is set to "Hide info", the LCD monitor will only indicate whether the file is on an SD card or on the internal memory.
To erase an image/video, simply select it and press the Delete button. By pressing the Menu button, there are several options available to the user:
| Playback menu | |
| Print set | Print selected (Select), Delete print set |
| Slide show | Start, Loop |
| Delete | Erase selected images, Erase all images |
| Protect | Select |
| Auto transfer | All on, All off, Select image(s) |
| Small pic | 640x480, 320x240, 160x120 |
| Copy | Internal to SD card, SD card to internal |
The Print set option allows you to select images to be printed on a DPOF-compatible printer. When the Slide show option is selected, the camera will cycle through the pictures on the camera with approximately three seconds between each image. When Loop is selected, the camera will loop the slideshow continuously. With the Delete option, you can delete specific images/videos or everything. The Protect option allows you to tag specific images/videos as protected. When an image/video is protected, it cannot be erased by using the delete function. However, if the internal memory or SD card is formatted, protected files will be erased. The "Auto transfer" option allows you to specify images that you want to transfer automatically when the camera is connected to a computer. The "Small pic" option allows you to create a smaller version of an existing image so that it can be emailed or uploaded to a webpage easily. Finally, the Copy option can copy images from the internal memory to an SD card or vice versa.
Originally published at https://www.anandtech.com/show/1643 (Wayback Machine).